npmを使用したweb開発環境構築(for Windows)
はじめに
Three.jsを使用した開発をするため,web開発環境の構築を行う.
web開発初心者なので,できるだけ簡単な方法でやりたい.
環境
Windows10 Home
開発環境構築
Node.jsのインストール
公式サイトからNode.jsをダウンロード.推奨版でいいと思われる.
nodejs.org
ダウンロードが終わったら実行.実行したら下の画面が表示されるのでNextをクリック.

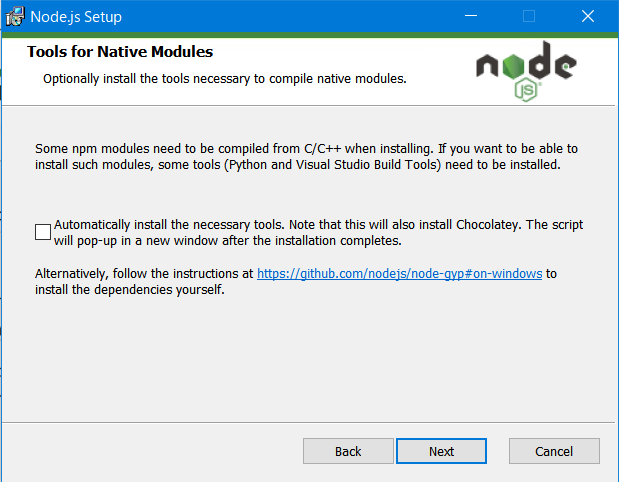
その後もNextを押して進めていく.下の画面が表示されたら,チェックを外してNextを押し,インストールを進めていく.
インストールが終わったらPCを再起動する.再起動が終わったら,コマンドプロンプトを起動し,以下のコマンドを実行.
node
以下の文字列が表示されたら成功.vの後の数字は自分が入れたバージョンになる.
Welcome to Node.js v18.16.0.
npmコマンドの使い方
プロジェクトフォルダの初期化
npm init
を実行.すると,色々聞かれるのでEnterを押して進める.
his utility will walk you through creating a package.json file.
It only covers the most common items, and tries to guess sensible defaults.

See `npm help init` for definitive documentation on these fields
and exactly what they do.

Use `npm install <pkg>` afterwards to install a package and
save it as a dependency in the package.json file.

Press ^C at any time to quit.
package name: (project2)
version: (1.0.0)
description:
entry point: (main.js)
test command:
git repository:
keywords:
author:
license: (ISC)
最後に
Is this OK? (yes)
と聞かれるので,yesと入力し,Enter. package.jsonが生成される.
また,
npm init -y
とすることで,質問をすべてスキップすることができる.
webpackのインストール
webpackとwebpackをCLIから利用するためのツールをインストール.
npm install --save-dev webpack webpack-cli
プロジェクトのディレクトリで以下のコマンドを実行し,srcフォルダを作成し,その中にindex.jsというファイルを作成する.このindex.jsにコードを記述する.
mkdir src
cd ./src
type nul > index.js
プロジェクトフォルダに戻り,バンドルを実行.
cd ../
npx webpack --watch
成功すると,プロジェクトフォルダにdistというフォルダが作成され,その中にmain.jsが作成される.
htmlでjavascriptのソースコードを呼び出す
distディレクトリの中にindex.htmlを作成し,以下を記述.
<!DOCTYPE html>
<html>
    <head>
        <meta charset="UTF-8"/>
        <title>title</title>
        <script src="./main.js"></script>
    </head>
    <body>

    </body>
</html>
htmlのプレビュー
visual studio codeの拡張機能で,Live Serverと検索し,インストール.


index.htmlを右クリックし,Open with Live Serverを選択すると,ブラウザの画面が表示され,実行結果を表示することができる.
おまけ(本題)
Three.jsのインストール
今回は,npmを使用したThree.jsのインストールを行う. プロジェクトフォルダの初期化が終わった後,
npm install three --save
これで,カレントディレクトリにnode_modulesとpackage-lock.jsonが生成される.
立方体の表示
index.jsに以下のコードを記述
import * as THREE from "three"
window.addEventListener('DOMContentLoaded', init);

function init() {
    const width = 960;
    const height = 540;

    // レンダラーを作成
    const renderer = new THREE.WebGLRenderer({
        canvas: document.querySelector('#myCanvas')
    });
    renderer.setSize(width, height);
    renderer.setPixelRatio(window.devicePixelRatio);

    // シーンを作成
    const scene = new THREE.Scene();

    // カメラを作成
    const camera = new THREE.PerspectiveCamera(45, width / height, 1, 10000);
    // カメラの初期座標を設定(X座標:0, Y座標:0, Z座標:0)
    camera.position.set(0, 0, 1000);

    // 箱を作成
    const geometry = new THREE.BoxGeometry(500, 500, 500);
    const material = new THREE.MeshStandardMaterial({color: 0x0000FF});
    const box = new THREE.Mesh(geometry, material);
    scene.add(box);

    // 平行光源
    const light = new THREE.DirectionalLight(0xFFFFFF);
    light.intensity = 2; // 光の強さを倍に
    light.position.set(1, 1, 1); // ライトの方向
    // シーンに追加
    scene.add(light);

    // レンダリング
    renderer.render(scene, camera);
}
index.html
<!DOCTYPE html>
<html>
    <head>
        <meta charset="UTF-8"/>
        <title>title</title>
        <script src="./main.js"></script>
    </head>
    <body>
        <canvas id="myCanvas"></canvas>
    </body>
</html>
このような画像がレンダリングされれば成功.
